
Geofences approach
What is geofences approach?
The approach geofence allows you to quickly receive a notification when 2 trackers are at a given distance from each other. Or get a notification about the approach of the tracker to a stationary object.
How does it works?
Unlike a regular geofence, the zone is set to a specific tracker and moves along with it, or to a stationary object.
Sets the range of the zone.
Another tracker is set, the approach of which needs to be tracked.
When the tracked tracker is within the radius of the zone, a notification will be sent.
Example for personal site users:
At lunchtime, Ann went to the cafe. As usual, when she went outside, she turned on her tracker.
Sitting in a cafe, Ann receives a notification that her friend Mary is 100 meters away from her.
Ann looks around and sees that Mary is walking past the cafe.
How is this possible?
Ann and Mary are friends at livegpstracks.com.
Ann created a 100-meter proximity geofence for her personal tracker and determined that she wanted to track the appearance of Mary's tracker in this area.
Ann and Mary had their trackers turned on. And when Mary's tracker approached Ann by 100 meters, Ann found out about it.
Example for organizations:
Company has 50 retail outlets in the city, which are visited daily by the company's drivers. Company managers want to know what time and whether the driver visited a certain point.
On the site livegpstracks.com, the company creates 50 stationary objects corresponding to each of the points.
Proximity geofences are created, where the central object is a stationary object of the outlet, and the tracked object is the tracker of the driver who visits this object.
When drivers arrive at the point of sale, this fact is recorded using the proximity zone. The manager receives a notification about this, or it is simply recorded in the event log, from which the time and fact of visiting the company's outlets by drivers can be uploaded later into a spreadsheet document.
How to set approach geofence?
➔ Go to tracker management (Top menu - Settings - tab “GPS Monitoring”)
➔ Find the submenu “Geofences” and click on it
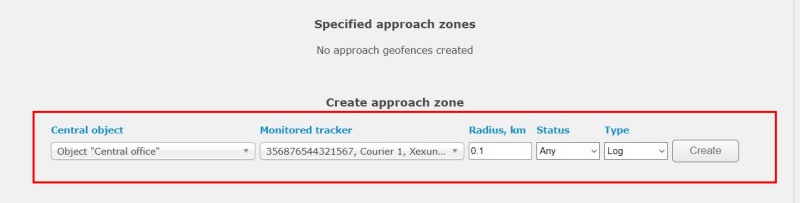
➔ Find “Specified approach zones”
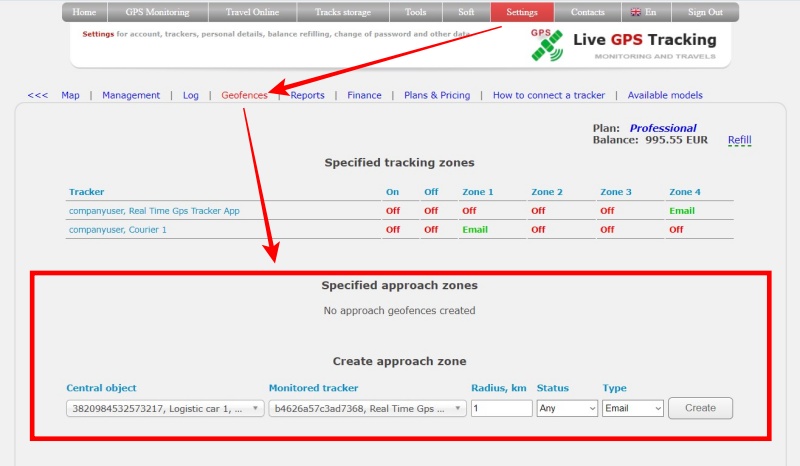
➔ In the “Create approach zone” block, fill in the fields:
- Central object - the object (tracker) around which the geofence will be created. When an object moves, it moves with it.
- Monitored tracker - an object whose approach to the central object needs to be tracked.
- Radius - the radius of the geofence around the central object.
- Status - geofence operation mode. If the status is “Included”, then the notification about entering the geofence will be only if the status of the tracked tracker is “enabled”, which is indicated by the green color of the object icon. If the status is “any”, then the geofence will work in any case.
- Type - notification type. There can be three options - Email, SMS, Messengers or just writing to the event log.
➔ Click the “Create” button
it should appear in the table in the “Specified approach zones” block
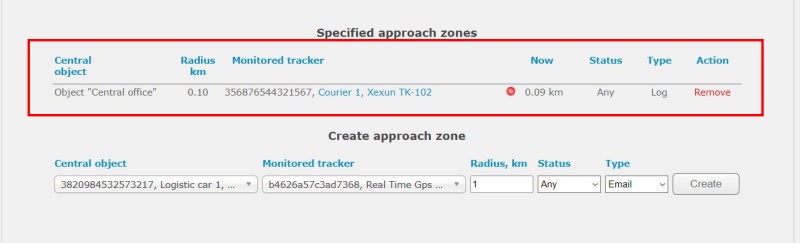
Geofence parameters in the table of the “Specified approach zones” block:
- Central object - the object (tracker) around which the geofence will be created. When an object moves, it moves with it.
- Radius - the radius of the geofence around the central object.
- Monitored tracker - an object whose approach to the central object needs to be tracked.
- Now - displays information about the tracked object - activity and distance from the central object.
- Status - geofence operation mode. If the status is “enabled”, then the notification about entering the geofence will be only if the status of the tracked tracker is “enabled”, which is indicated by the green color of the object icon. If the status is “any”, then the geofence will work in any case.
- Type - notification type. There can be three options - Email, SMS or just writing to the event log.
- Action - delete geofence.
To create another zone, repeat the steps above.
You should pay attention to the following points:
- it is impossible to create two completely identical geofences
- Notification about the operation of the geofence only when ENTERING the geofence. Those. when approaching.
How to remove the approach zones?
In the “Specified approach zones” block, in the “Action” column, click on “Remove” next to the desired zone.
Which trackers can be equipped with approach zones?
Only trackers connected to the account can be selected as the central object.
As monitored objects, you can set approach zones on trackers connected to your account, as well as on trackers of friends to which the account has access.
Is the approach zone displayed on the map?
Approach zones are not displayed on the map. All actions are performed only through the corresponding menu of the Tracker Management.
Is there a limit on the number of zones that can be installed?
There is no limit on the number of zones that can be set.
At what rates is the option available?
Proximity geofences are available on “Simple” and higher tariffs.