

To connect your device, you have to do next steps:
Step 1. Set up device
Before set up
✅ Prepare your tracker's Sim card
- Delete pin code at start (insert Sim card to smartfone/tablet/any phone and turn off pin code)
- Connect the tariff with the Internet and SMS
✅ Insert a SIM card into your device
✅ Choose how to configure the device
- SMS commands (most devices)
- How to find SMS commands? Answer: Look at the instruction that come with the tracker.
- If there is not commands read our recomendation here
 If the instruction does not contain commands or necessary commands
- Сonfiguration through special software (specialized equipment)
- If the tracker has the ability to configure this type, then there will be information about it on the manufacturer's website or in inctruction to device. If there is no such information, most likely the tracker is configured only through SMS commands.
✅ Remember the most important rule when setting up a tracker - calmness and sequence of actions.
- Setup may not work the first time.
- The biggest mistake is to start randomly sending commands, repeatedly resetting the settings completely and thinking that the monitoring platform is not working.
Сonfiguration through SMS commands.
How is the setting going?
- A SIM card is inserted into the tracker, you know its number.
- On your phone, you type an SMS message with the text of the command and send it to the number inserted into the tracker.
- The tracker receives a message with command and, as a rule, sends a response to your phone whether it accepted the command or not.
Order to send commands:
✅ The command to reset the tracker to factory settings
It is recommended if the tracker is used or has not been used for a long time and it is not clear what settings could be set there
✅ Command to set the control number
Not on all trackers, but on many Chinese, you first need to set the number from which commands will come.
If the number is not set, devices may ignore receiving commands.
✅ Command to set an Internet access point (APN)
The name of the access point itself must be viewed on the website of the mobile operator whose SIM card is inserted into the tracker
✅ Command to set data transmission interval
For the initial setup, we recommend setting the minimum interval to 10-30 seconds. This will make it easier to understand whether the tracker works or not.
In the future, when you make sure that the tracker works on the monitoring server, you can set the interval you need.
✅ Commands for disabling various saving modes
Some trackers have modes when trackers turn off data transfer to the server under certain conditions.
Often in instructions, such commands are called “alarm”. For example, it can be a command to turn off the tracker if there is no movement.
For the initial setup, we advise you to disable such modes as much as possible. After successful setup, you can install them if necessary.
✅ Command to set server address and port
At this point go to step 2
Сonfiguration through special software
How is the setting going?
- Install specialized software on your computer provided by the device manufacturer
- Connect the tracker to your computer. You can read about the type of cable here
How to configure:
In the software find next fields:
✅ To set an Internet access point (APN)
The name of the access point itself must be viewed on the website of the mobile operator whose SIM card is inserted into the tracker
✅ To set data transmission interval
For the initial setup, we recommend setting the minimum interval to 10-30 seconds. This will make it easier to understand whether the tracker works or not.
In the future, when you make sure that the tracker works on the monitoring server, you can set the interval you need.
✅ Settings for disabling various saving modes
Some trackers have modes when trackers turn off data transfer to the server under certain conditions.
Often in instructions, such commands are called “alarm”. For example, it can be a command to turn off the tracker if there is no movement.
For the initial setup, we advise you to disable such modes as much as possible. After successful setup, you can install them if necessary.
✅ To set server address and port
At this point go to step 2
My tracker is alredy configured and working with another monitoring platform
If your tracker is already configured and works correctly with some other monitoring platform:
Find only one SMS command to change server address and port
At this point go to step 2
❗ Relevant only if the tracker is now sending data to any other server. If the tracker has not been used for a long time, then it is worth doing the setup steps again.
Software trackers
How is the setting going?
Software trackers are configured through the settings in the application itself. Find and change necessary settings
How to configure:
Settings to find in the app:
✅ To set data transmission interval
For the initial setup, we recommend setting the minimum interval to 10-30 seconds. This will make it easier to understand whether the tracker works or not.
In the future, when you make sure that the tracker works on the monitoring server, you can set the interval you need.
✅ To set server address and port
At this point go to step 2
Step 2. Set up correct server port
Setting the port is the most important step in configuring the device.
Whether you see the tracker on the map or not depends only on the correctly installed port.
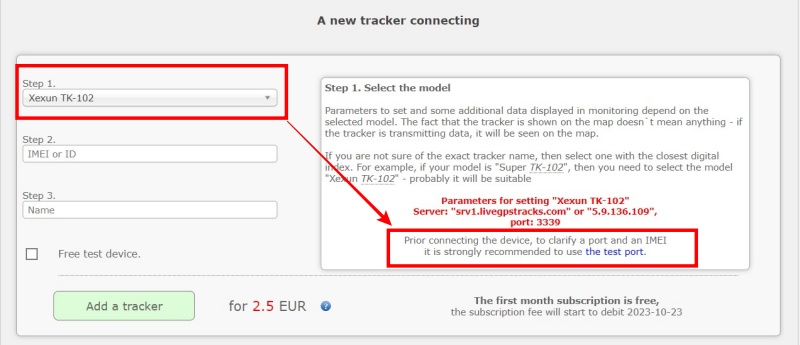
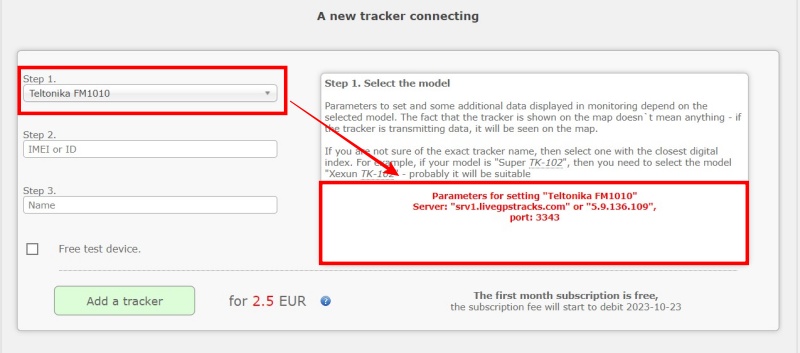
How to choose the correct port?
Open the form for adding a new tracker in your account on the livegpstracks.com website or in the “Mobile Dispatcher” application
In the “Tracker model” field, select the name of your model Once selected, you will see in red the intended port on which this model should work.
Carefully look at the information and if you see the inscription “Before adding a device, to clarify the port and IMEI, we strongly recommend using a test port.”, then you need to use a test port first.
You should not try a real port, most likely there will be no result and only waste a lot of time.
How to use Test port read in this article
If there is no such inscription, then immediately enter the port that is written in the text.
Text about using a test port:
On the website:
When you need to use a working port at once:
Set the server address and port using the SMS command or other methods described in step 1.
Step 3. Add tracker to your livegpstracks.com account
➔ Go to tracker management (Top menu - Settings - tab “GPS Monitoring”)
➔ In the submenu “Management” - “My trackers” - “A new tracker connecting” block
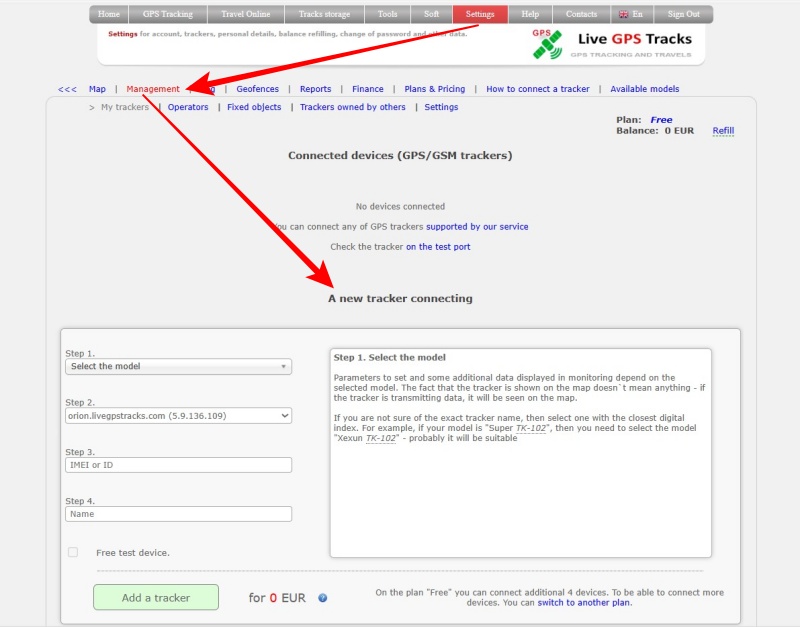
Fill in the fields:
✅ Step 1. the device model is a mandatory parameter. Once connected, you can change it.
- Does model selection affect the display of coordinates? Read here
- What to do if the test port gives IMEI and port, but my model is not in the list. Read here
✅Step 2. Select the server complex that will be responsible for receiving and storing data from the tracker
This setting can be changed at any time without removing the tracker.
- Read about server complexes here
✅ Step 3. Unique identifier (IMEI or device ID) is a mandatory parameter. Once connected, it cannot be changed. One unique identifier (IMEI/ID) can only be connected to one account
- Read useful information about IMEI here
✅ Step 4. Device name is an optional parameter. It can be changed after connection.
Allows you to identify the tracker more conveniently when viewing it on the map or in Mobile Dispatcher app. If the field is not filled in, the device model will be displayed on the map.
Step 4. See the tracker on the map
In step 2, you selected the port on which the tracker should work and entered this port in your device settings.
In step 3 you connected the tracker to your account.
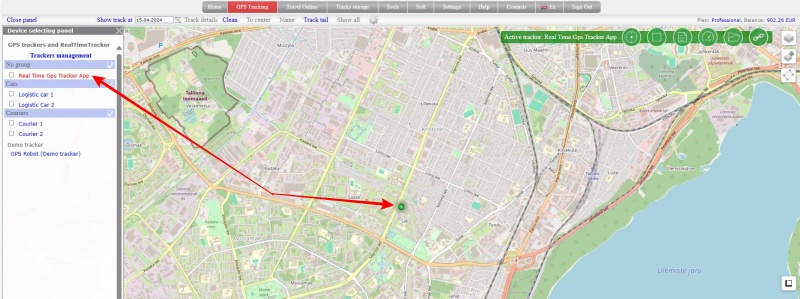
Go to the “GPS Tracking” section (top menu of the site)
Horizontal menu → item “View all trackers” . Click on it to go to the map.
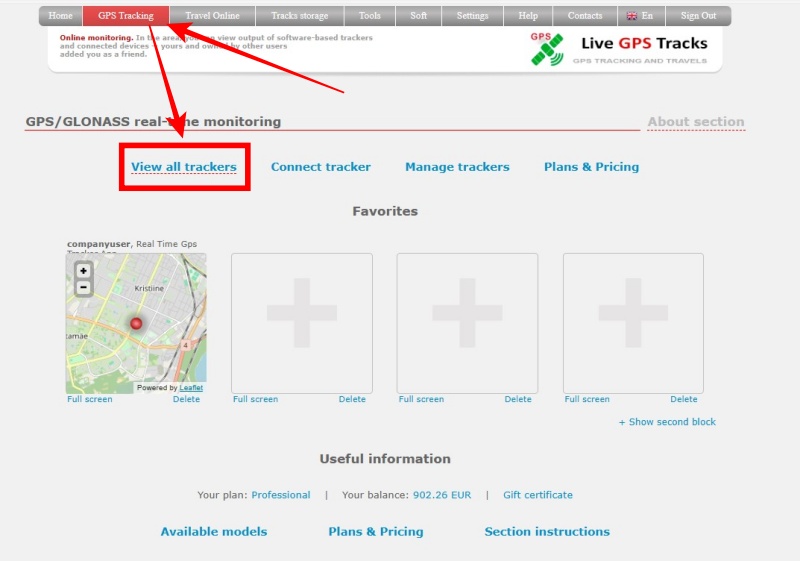
If you have made the setting correctly, you will see the actual location of your device on the map.
If the tracker is not displayed in the real location see the article Typical connection and usage problems.